Porting Bat BioAcoustics

Whilst researching existing approaches to Bat Recognition, we discovered an open source MS Windows program called Bat BioAcoustics – http://sourceforge.net/projects/batbioacoustics/.  This analyses a Bat recording and performs call detection to find where in the call there are bat signals, extracts audio features (such as maximum frequency) from the call, and then performs pattern matching (using Support Vector Machines) to categorise the calls to a species level.  Although we are hoping to ultimately do real-time analysis, this program would be an excellent prototype to test if a phones CPU is fast enough to carry out the calculations.  With this in aim, we decided to investigate porting Bat BioAcoustics to an iPhone.

Bat BioAcoustics (BBA) is written in C++, and has a number of dependent libraries:

  • QT – A graphical user interface toolkit
  • libsndfile – An open source audio format library
  • FFTW – An open source fourier transform/DSP library

Although we could have attempted to compile these into our phone application, it would be better to replace them with the native iOS equivalents.  We attempted to replace:

  • QT with the iOS GUI toolkit
  • libsndfile with the iOS CoreAudio library
  • FFTW with the iOS vDSP library

Replacing QT with the iOS GUI toolkit

BioAcoustics runs as a native MS Windows application, with a graphical interface where users can choose the input files to analyse, and then it writes the results to an output file on disc.  We removed from BioAcoustics the sections that controlled the interface, and we then converted the application to run from a command line.  Supplying the information it previously obtained from the interface using the command line provided a convenient way to test it still worked without the QT toolkit.  Once the other two libraries were replaced, we could replace the command line interface with a native iPhone interface.

Replacing libsndfile with iOS CoreAudio

libsndfile is an open source library that is used to read in various different audio formats, and extract the raw audio.  Ultimately audio is just a series of numbers, but storing these literally is very inefficient.  Instead they are normally compressed using a variety of different formats.  For this project, we’re not interested in the details of how they are stored – we just need the raw audio data from the files – and so libsndfile provides a common set of methods to obtain this raw data without needing to know the details of the file format.

Apple provide a similar set of methods in their CoreAudio library, and so we will convert BioAcoustics to use these instead.

BioAcoustics code contained a wrapper class that simplified the details of calling libsndfile from the rest of the code.  Instead of every piece of code that needed audio samples having to set up libsndfile itself, this class carried out the low level setup, leaving the rest of the code clearer by reducing the number of functions it needed to call.  The wrapper has 2 fundamental methods:

bool SndFile::read(std::string const& path)
Audio SndFile::getAudio()

As long as our wrapper class kept the same methods and parameters, we could swap the classes from using libsndfile to CoreAudio without the rest of BioAcoustics noticing, which is exactly what we did.  We wrote a new class that had the same method signatures, but instead of then using libsndfile to read the raw samples from the audio file format, we used iOS CoreAudio, as desribed at  Audio on an iPhone.

We could now investigate replacing the DSP library FFTW with the iOS equivalent – vDSP

Replacing FFTW with the iOS vDSP library

FFTW is an open source Fourier/DSP library.  BioAcoustics uses this to perform the low level signal analysis and to extract frequency-series information from the time-series call.  Apple provide their own Fourier/DSP library called vDSP, also known as the “Accelerate Framework”.

As with libsndfile, BioAcoustics code contained a wrapper class that simplified the details of calling FFTW from the rest of the code.  This wrapper has 3 fundamental methods:

setPlan(int &fftSize, window_type &window_t)
process(std::vector<float> &audioSamples, int &start) 
getSpectrum(std::vector<float> &audioSamples, int &start)

We wrote a new class that kept the same method signatures, but instead of using FFTW to do the low level mathematics, we used the iOS vDSP library as described in  Fourier Transforms on an iPhone.  Replacing the BioAcoustics wrapper with our own meant that every time BioAcoustics thought it was calling FFTW, we actually used vDSP instead without it realising the difference.

Building the first iPhone App

Now these three things were in place, we could investigate building our first functioning prototype.  Having replaced libsndfile and FFTW with native iOS equivalents, we could run BioAcoustics from the command line on a Mac, using the iPhone simulator.  The next step is to write an iPhone user interface for it.

BioAcoustics is written in C++, but Apples user interface toolkit requires code to be written in Objective-C.   Objective-C  and C++ code can both run in the same application, but it can be tricky to avoid problems when they interact.  To reduce the number of potential problems, we wanted as few points of contact between the iPhone GUI, and BioAcoustics as possible.  To achieve this, we wrapped the entire BioAcoustics code into a library, that contains one fundamental method:

deque<Event> Bioacoustics::analyse(string path)

Here we can simply pass BioAcoustics the path of the file we would like to analyse, and it will return a list of custom Event objects, containing all the information about each detected call event.  This means we can write all our GUI code in Objective-C as normal, we already have the BioAcoustics in C++, and we’ve minimised any potential problems for the interaction between them both.

In Action

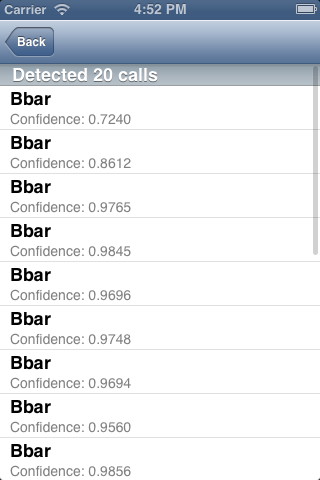
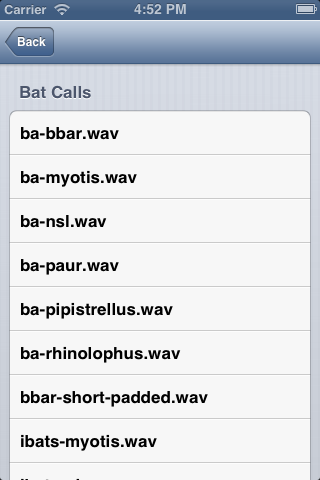
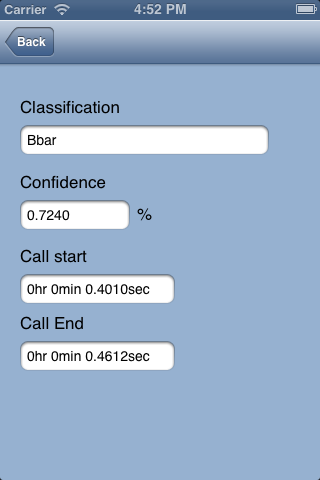
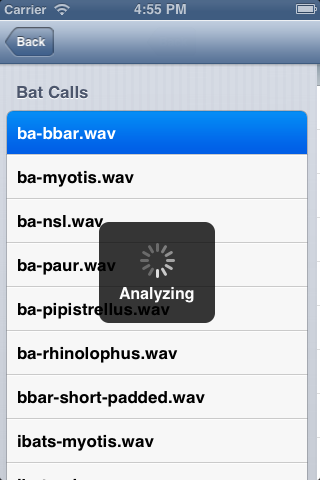
So once this was all done, we had the first functioning prototype!  It might not look too great yet, but it’s exciting to be able to test if an iPhone is capable of doing this level of analysis.

1) Choose from a list of files to analyse:iOS Simulator Screen shot 13 May 2013 16.52.19
2) BioAcoustics is running:
iOS Simulator Screen shot 13 May 2013 16.55.10

3) We have a list of detected Bat Calls:

iOS Simulator Screen shot 13 May 2013 16.52.27

4) We can view some more information about each call:iOS Simulator Screen shot 13 May 2013 16.52.35
 Conclusion

Porting BioAcoustics to an iPhone has been a resounding success!  It’s been quite a process but we’ve shown that it is possible to perform the level of audio analysis needed to automatically detect and recognise bat signals from supplied audio. Analysing a 14sec  file took 5sec to perform, which also suggests it will be easily possible to run this analysis on a phone in realtime.

Because this was a prototype to test the concept, so far we have used a pre-supplied list of call sample files.  The next stage will be to implement real time recording and analysis,  which will need to use an external time-expansion bat detector.  These are pieces of equipment that reduce the frequency of the ultrasonic audio from the bat down to a level that an iPhone is capable of recording.  Once the iPhone can record the audio, we can attempt to analyse it in real time.  Another useful enhancement would be to display realtime sonograms (spectrograms) on the phone, to aid researchers in their own visual analysis of the signal.



Bat BioAcoustics

This post continues the discussion of how to perform audio analysis on an iPhone in order to recognise bat calls.  For the previous post, which covers some of the mathematical techniques please see Fourier Transforms on an iPhone.

The last blog posting ended with a very simplistic way to detect a bat call within an audio sample, and a promise to explain some more sophisticated methods.  Whilst researching signal detection algorithms, we were made aware of an existing open source program that does a very similar thing to what we are attempting – Bat BioAcoustics, written by Chris Scott from Leeds University.

BioAcoustics is written in C++, and although it’s a desktop application, a lot of the algorithms in it are portable to any system which has a C++ compiler.  Fortunately, an iPhone is one such system.

In order to analyse and classify bat calls in bat species, BioAcoustics performs the following steps:

  1. Load audio from a WAV file into memory.
  2. Detect each individual bat call within the file.
  3. Extract certain audio features for each call, e.g. maximum frequency,  bandwidth and other features
  4. Use a Support Vector Machine model to classify each call

It has a dependency on the following open source libraries:

  • QT – to provide a desktop GUI toolkit
  • libsndfile – to read audio from a WAV file into memory
  • FFTW – for Fourier analysis
  • libsvm – to run the SVM models

As mentioned in previous blog posts, Apple provide APIs that can perform audio and signal analysis, and they also provide a GUI toolkit for iPhones.  So if we can replace the first three of these libraries – QT, libsndfile and FFTW – with Apples native equivalents, we should be able to port the signal analysis and call matching sections of Bat BioAcoustics to an iPhone.

Finally, BioAcoustics is released under the GPL open source license – which is the same license we will be releasing code from BatMobile under – so there are no legal obstacles to doing this.

Reading Audio Files

The previous two posts, Audio Analysis on an iPhone and Fourier Transforms on an iPhone have covered some of the theory of audio sampling and analysis.  What hasn’t been mentioned, is how audio samples are actually loaded into our program.  There are fundamentally two ways to do this:

  1. Realtime sampling of incoming audio.  For bat calls, this would be the output from a time expanding bat detector.
  2. Loading pre-recorded audio from a file.

Initially we will be using method (2).  As mentioned before, it’s much easier to load samples from a file, rather than make a bat squeak into a microphone on demand!

So we need to read from an audio file on disk  to a list of samples held in an array in our program.  Apple provide tools to do this, in the form of an API called Core Audio.  As with the Accelerate/vDSP framework, this is quite a low level API in C, and it has a reputation for being tricky to use.  Fortunately for us, we only need to use a small part of it that deals with reading and converting audio formats.

Loading Audio

Obtain a reference to the audio file:

// myFile is the filesystem path and filename we are loading
CFStringRef str = CFStringCreateWithCString(
    NULL, 
    myFile, 
    kCFStringEncodingMacRoman
);
CFURLRef inputFileURL = CFURLCreateWithFileSystemPath(
    kCFAllocatorDefault,
    str,
    kCFURLPOSIXPathStyle,
    false
);

 ExtAudioFileRef fileRef;
 ExtAudioFileOpenURL(inputFileURL, fileRef);

Transform the audio file into the format we want:

    
// "sample"  - An instantaneous amplitude of the signal in a 
// single audio channel, represented as an integer, 
// floating-point, or fixed-point number. 

// "channel" - A discrete track of audio. A monaural recording has 
// exactly one channel.

// "frame"   - A set of samples that contains one sample from 
// each channel in an audio data stream

// "packet"  - An encoding-defined unit of audio data comprising 
// one or more frames. For PCM audio, each packet corresponds to 
// one frame.

// A "packet" contains a "frame" which contains 
// "channels" which contain "samples".
// For mono PCM, there is one channel, so one channel per frame, 
// and one frame per packet.  So each packet contains only one 
// sample.

    // Set up audio format we want the data in
    // Each sample is of type Float32
    AudioStreamBasicDescription audioFormat;
    audioFormat.mSampleRate = 44100;
    audioFormat.mFormatID = kAudioFormatLinearPCM;
    audioFormat.mFormatFlags = kLinearPCMFormatFlagIsFloat;
    audioFormat.mBitsPerChannel = sizeof(Float32) * 8;
    audioFormat.mChannelsPerFrame = 1; // Mono
    audioFormat.mBytesPerFrame = audioFormat.mChannelsPerFrame * sizeof(Float32);  // == sizeof(Float32)
    audioFormat.mFramesPerPacket = 1;
    audioFormat.mBytesPerPacket = audioFormat.mFramesPerPacket * audioFormat.mBytesPerFrame; // = sizeof(Float32)

    // 3) Apply audio format to the Extended Audio File
    ExtAudioFileSetProperty(
        fileRef,
        kExtAudioFileProperty_ClientDataFormat,
        sizeof (AudioStreamBasicDescription), //= audioFormat
        &audioFormat);

Allocate some space in memory:

    int numSamples = 1024; //How many samples to read in at a time
    UInt32 sizePerPacket = audioFormat.mBytesPerPacket; // = sizeof(Float32) = 32bytes
    UInt32 packetsPerBuffer = numSamples;
    UInt32 outputBufferSize = packetsPerBuffer * sizePerPacket;

    // So the lvalue of outputBuffer is the memory location where we have reserved space
    UInt8 *outputBuffer = (UInt8 *)malloc(sizeof(UInt8 *) * outputBufferSize);

    convertedData.mNumberBuffers = 1;    // Set this to 1 for mono
    convertedData.mBuffers[0].mNumberChannels = audioFormat.mChannelsPerFrame;  //also = 1
    convertedData.mBuffers[0].mDataByteSize = outputBufferSize;
    convertedData.mBuffers[0].mData = outputBuffer; //

And then finally read the audio in:

    
    UInt32 frameCount = numSamples;
    while (frameCount > 0) {
        ExtAudioFileRead(
            fileRef,
            &frameCount
        )
     if (frameCount > 0)  {
            AudioBuffer audioBuffer = convertedData.mBuffers[0]; 
            float *samplesAsCArray = (float *)audioBuffer.mData; // Cast from the audio buffer to a C style array
            std::vector samplesAsVector;                  // And then to a temporary C++ vector;
            samplesAsVector.assign(samplesAsCArray, samplesAsCArray + frameCount); 
            samples.insert(samples.end(), samplesAsVector.begin(), samplesAsVector.end()); // And then into our final samples vector
        }
    }

Finally after all that, we have arrived with our audio samples as a C++ vector, which we can then analyse with Apples digital signal processing API.

One important caveat is we have the entire audio file uncompressed in memory. This is fine for short recordings (< 1min), for longer recordings we would need a way to process the file in sections.

Fourier Transforms on an iPhone

This blog posting continues the discussion of how to perform audio analysis on an iPhone.  For some background information, please see the previous post – Audio Analysis on an iPhone.

Apple provide a digital signal processing API called vDSP (also known as the Accelerate framework).  To quote their website, it provides “ mathematical functions for applications such as speech, sound, audio, and video processing, diagnostic medical imaging, radar signal processing, seismic analysis, and scientific data processing.”

We will be using this to analyse the audio, and extract the frequency information.  Initially we will be loading audio from pre-recorded WAV files.  Although the ultimate aim is to perform realtime analysis, it’s much easier to develop using pre-recorded files than try to make a bat squeak into a microphone on demand!

The vDSP fourier transform (FFT) functions are a bit tricky to use.  For real inputs, they do an in-place FFT, which means the samples in the input buffer are replaced with the output of the FFT.  This is possible because for a real FFT of size N, the complex output is symmetrical about N/2.  This means the last half of FFT is redundant information, and we can instead use it to store the complex component of the output.  For more detailed info, see Apple’s API.

We also want to apply a window function to reduce spectral leakage.  We will use a Hamming window.

Out input parameters:

float *samples; // This is filled with samples, loaded from a file
int numSamples = 256;  // The number of samples

Initialise the FFT:

// Setup the length
vDSP_Length log2n = log2f(numSamples);

// Calculate the weights array. This is a one-off operation.
FFTSetup fftSetup = vDSP_create_fftsetup(log2n, FFT_RADIX2);

// For an FFT, numSamples must be a power of 2, i.e. is always even
int nOver2 = numSamples/2;

// Populate *window with the values for a hamming window function
float *window = (float *)malloc(sizeof(float) * numSamples);
vDSP_hamm_window(window, numSamples, 0);
// Window the samples
 vDSP_vmul(samples, 1, window, 1, samples, 1, numSamples);

// Define complex buffer
 COMPLEX_SPLIT A;
 A.realp = (float *) malloc(nOver2*sizeof(float));
 A.imagp = (float *) malloc(nOver2*sizeof(float));

 // Pack samples:
 // C(re) -> A[n], C(im) -> A[n+1]
 vDSP_ctoz((COMPLEX*)samples, 2, &A, 1, numSamples/2);

Run the FFT:

 //Perform a forward FFT using fftSetup and A
 //Results are returned in A
 vDSP_fft_zrip(fftSetup, &A, 1, log2n, FFT_FORWARD);

 //Convert COMPLEX_SPLIT A result to magnitudes
 float amp[numSamples];
 amp[0] = A.realp[0]/(numSamples*2);
 for(int i=1; i<numSamples; i++) {
   amp[i]=A.realp[i]*A.realp[i]+A.imagp[i]*A.imagp[i];
   printf("%f ",amp[i]);
 }

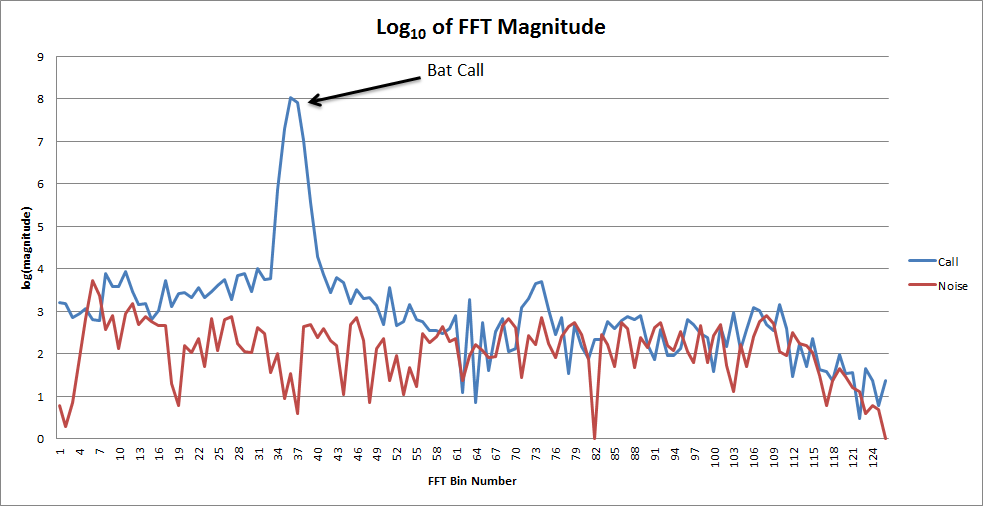
We now have the frequency spectrum amplitudes in amp[i] for the first 256 audio samples.  If we are sampling at 44kHz, that means we have the spectrum from the first (256/44000) = 0.0058sec of the call.  From Nyquist (see previous post), the maximum frequency we can detect is 22kHz, and because our FFT is symmetrical we have 128 output bins.  This means each bin width is 22,000/128 = 171Hz.  We are using a time expanded bat call here, so the bats original ultrasonic signal (20kHz-100kHz) has been reduced in frequency to a human audible range (0-20kHz).

An example of the logarithmic output from the FFT:

fft

We need to detect the start and end of each bat call in our test file.  To do this we need to run an FFT on each subsequent set of 256 audio samples, and look for amplitudes in the spectrum ranges of the sounds produced by a bat.

A very rough method to do this would be to maintain a rolling average of the values for certain frequencies (FFT bins), and if a new value is much larger than the average, it’s likely to be a call.  There are better ways however, that involve more precise measurement of the background noise, and calculate the signal to noise ratio.

These will be detailed in a later blog post.

Audio Analysis on an iPhone

Of the four main mobile platforms (Android, iOS, Blackberry and Windows Mobile) we have chosen to target iOS.  This was chosen due to the expertise of the developers on the project, and because iOS provides a native programming interface (API) for performing signal processing and linear algebra calculations.

In A picture of the challenge ahead you can see the main steps involved in identifying a bat call.  The 1st step major step in this is “(3) -Enable call isolation”

Enable call isolation

Fundamentally, an audio file is simply a long list of numbers specifying the amplitude of a sound wave over time.  If you imagine a sound wave moving through the air and hitting the magnet in a microphone, the amplitude is the distance from the origin that the magnet moves.

This is an analogue signal.  In order for a computer to process it, it needs to be converted to a digital representation.  This is called “sampling”, and is a measurement of the position of the microphone taken many times a second.  A theorem called the Nyquist sampling theorem states that in order to sample a signal of X Hz without significant loss of quality, you need to sample at 2X the frequency.  The limit of human hearing is approximately 20kHz, which hence requires a sample rate of approximately 40Khz.  This is why CDs are sampled at 44Khz.  i.e. each second of recording in a CD contains 44,000 measurements of the highest possible frequency contained in the recording.

A 10x “time expansion” bat detector would record 1sec of audio and play this back over 10sec.  For a Pipistrelle this would reduce it’s frequency from about 50kHz to 5Khz, which can be recorded by ordinary equipment with a sample rate of 44.1kHz.  Without the time expansion we would require specialist equipment that could sample at 100kHz.

Once we have our recording, we need to identify where within it there are actual bat calls.  We have a measurement of audio amplitude against time, which isn’t very easy to analyse.  We want to identify where there are certain frequency characteristics within this audio.  To convert from a time domain to a frequency domain we need to perform a Fourier transform.  Because we have digitally sampled data, we need a discrete Fourier transform, and we will use a quick form of this called a fast Fourier  transform (FFT).  Apple’s iOS provides a native API for performing FFTs and other linear alegebra.  We will be using this to process the time expanded bat calls and detect where within the audio there is a call.

The next blog posting will go into this in detail.